# 通俗易懂的 TS 教程(上)
我之前学习 TS,是死磕 TS 文档,非常枯燥,上手难度大,多次劝退我,学习效率很低,而且学了就忘。
我们的目标是,学完本文,能够应付日常开发,遇到不懂的新知识时,知道怎么去查,即可。
# 为什么要学 TS
TS 已经快成为一个前端的基本技能了。
如今别说 React,连 Vue 的默认版本都已经是 Vue3 了,Vue3 和 Typescript 是绑在一起的。
# TS 基础
# 基础类型
boolean、number 和 string 类型
# boolean
let isOK: boolean = true;
赋值与定义的不一致,会报错,静态类型语言的优势就体现出来了,可以帮助我们提前发现代码中的错误。

# number
let age: number = 24;
# string
let realName: string = 'Sugar';
let fullName: string = `A ${realName}`; // 支持模板字符串
2
undefined 和 null 类型
let u: undefined = undefined; // undefined 类型
let n: null = null; // null 类型
2
默认情况下 null 和 undefined 是所有类型的子类型。就是说你可以把 null 和 undefined 赋值给 number 类型的变量。
let isOK: boolean = undefined;
let age: number = null;
2
但是如果 tsconfig.json 指定了 --strictNullChecks 标记,null 和 undefined 只能赋值给它们各自,undefined 还可以赋值给 void,其他情况报错。
any、unknown 和 void 类型
# any
不清楚用什么类型,可以使用 any 类型。这些值可能来自于动态的内容,比如来自用户输入或第三方代码库。但是不建议使用 any,不然就丧失了 TS 的意义。
let notSure: any = 4;
notSure = 'maybe a string'; // 可以是 string 类型
notSure = false; // 也可以是 boolean 类型

notSure.name; // 可以随便调用属性和方法
notSure.getName();
2
3
4
5
6
# unknown 类型
unknown 类型代表任何类型,它的定义和 any 定义很像,但是它是一个安全类型,使用 unknown 做任何事情都是不合法的。
比如,这样一个 fn 函数,
function fn(param: any) {
  return param / 2;
}
2
3
把 param 定义为 any 类型,TS 就能编译通过,没有把潜在的风险暴露出来,万一传的不是 number 类型,不就没有达到预期了吗。
把 param 定义为 unknown 类型 ,TS 编译器就能拦住潜在风险,如下图:
function fn(param: unknown) {
  return param / 2;
}
2
3

配合类型断言,即可解决这个问题
function fn(param: unknown) {
  return (param as number) / 2;
}
2
3
# void
void 类型与any类型相反,它表示没有任何类型。
比如函数没有明确返回值,默认返回 void 类型
function hello(): void {
  console.log('hello');
}
2
3
never 类型
never 类型表示的是那些永不存在的值的类型,比如:
如果一个函数执行时抛出了异常,那么这个函数永远不存在返回值,因为抛出异常会直接中断程序运行。
函数中执行无限循环的代码,使得程序永远无法运行到函数返回值那一步。
// 异常
function fn(msg: string): never {
  throw new Error(msg);
}

// 死循环 千万别这么写,会内存溢出
function fn(): never {
  while (true) {}
}
2
3
4
5
6
7
8
9
never 类型是任何类型的子类型,也可以赋值给任何类型。
没有类型是 never 的子类型,没有类型可以赋值给 never 类型(除了 never 本身之外)。即使 any 也不可以赋值给 never。
let test: never;
test = 'oh no'; // 报错,Type 'string' is not assignable to type 'never'
2
let test1: never;
let test2: any;

test1 = test2; // 报错,Type 'any' is not assignable to type 'never'
2
3
4
数组类型
let list: number[] = [1, 2, 3];
list.push(4); // 可以调用数组上的方法
2
数组里的项写错类型会报错

push 时类型对不上也会报错

如果数组想每一项放入不同数据怎么办?用元组类型
元组类型
元组类型允许表示一个已知元素数量和类型的数组,各元素的类型不必相同。
let tuple: [number, string] = [24, 'Sugar'];
写错类型会报错

越界会报错

可以对元组使用数组的方法,比如使用 push 时,不会有越界报错
let tuple: [number, string] = [24, 'Sugar'];
tuple.push(18); // 但是只能 push 定义的 number 或者 string 类型
2
push 一个没有定义的类型,报错

# 函数类型
TS 定义函数类型需要定义输入参数类型和输出类型。
输出类型也可以忽略,因为 TS 能够根据返回语句自动推断出返回值类型。
function add(x: number, y: number): number {
  return x + y;
}
add(1, 2);
2
3
4
函数没有明确返回值,默认返回 void 类型
函数表达式写法
function add(x: number, y: number): number {
  return x + y;
}
2
3
可选参数
参数后加个问号,代表这个参数是可选的
function add(x: number, y: number, z?: number): number {
  return x + y;
}
add(1, 2);
add(1, 2, 3);
2
3
4
5
注意可选参数要放在函数入参的最后面,不然会导致编译错误。

默认参数
function add(x: number, y: number = 100): number {
  return x + y;
}
add(100); // 200
2
3
4
跟 JS 的写法一样,在入参里定义初始值。
和可选参数不同的是,默认参数可以不放在函数入参的最后面,
看下面的代码,add 函数只传了一个参数,如果理所当然地觉得 x 有默认值,只传一个就传的是 y 的话,就会报错,

如果带默认值的参数不是最后一个参数,用户必须明确的传入 undefined值来获得默认值。
add(undefined, 100); // 200
函数赋值
JS 中变量随便赋值没问题,
let add = (x = 100, y) => {
  return x + y;
};

add = '123';
2
3
4
5
但在 TS 中函数不能随便赋值,会报错的,

也可以用下面这种方式定义一个函数 add1,把 add1 赋值给 add2
const add1 = (x: number = 100, y: number): number => {
  return x + y;
};

const add2: (x: number, y: number) => number = add1;
2
3
4
5
当然,不用定义 add2 类型直接赋值也可以,TS 会在变量赋值的过程中,自动推断类型,如下图:

函数重载
函数重载是指两个函数名称相同,但是参数个数或参数类型不同,他的好处显而易见,不需要把相似功能的函数拆分成多个函数名称不同的函数。
# 不同参数类型
比如我们实现一个 add 函数,如果传入参数都是数字,就返回数字相加,如果传入参数都是字符串,就返回字符串拼接。
function add(x: number[]): number;
function add(x: string[]): string;
function add(x: any[]): any {
  if (typeof x[0] === 'string') {
    return x.join();
  }
  if (typeof x[0] === 'number') {
    return x.reduce((acc, cur) => acc + cur);
  }
}
2
3
4
5
6
7
8
9
10
在 TS 中,实现函数重载,需要多次声明这个函数,前几次是函数定义,列出所有的情况,最后一次是函数实现,需要比较宽泛的类型,比如上面的例子就用到了 any。
# 不同参数个数
假设这个 add 函数接受更多的参数个数,比如还可以传入一个参数 y,如果传了 y,就把 y 也加上或拼接上,就可以这么写。
function add(x: number[]): number;
function add(x: string[]): string;
function add(x: number[], y: number[]): number;
function add(x: string[], y: string[]): string;
function add(x: any[], y?: any[]): any {
  if (Array.isArray(y) && typeof y[0] === 'number') {
    return (
      x.reduce((acc, cur) => acc + cur) + y.reduce((acc, cur) => acc + cur)
    );
  }
  if (Array.isArray(y) && typeof y[0] === 'string') {
    return x.join() + ',' + y.join();
  }
  if (typeof x[0] === 'string') {
    return x.join();
  }
  if (typeof x[0] === 'number') {
    return x.reduce((acc, cur) => acc + cur);
  }
}

console.log(add([1, 2, 3])); // 6
console.log(add(['Sugar', '24'])); // 'Sugar,18'
console.log(add([1, 2, 3], [1, 2, 3])); // 12
console.log(add(['Sugar', '24'], ['man', 'handsome'])); // 'Sugar,18,man,handsome'
2
3
4
5
6
7
8
9
10
11
12
13
14
15
16
17
18
19
20
21
22
23
24
25
其实写起来挺麻烦的,后面了解泛型之后写起来会简洁一些,不必太纠结函数重载,知道有这个概念即可,平时一般用泛型来解决类似问题。
# interface
基本概念
interface(接口) 是 TS 设计出来用于定义对象类型的,可以对对象的形状进行描述。
定义 interface 一般首字母大写,代码如下:
interface Person {
  name: string;
  age: number;
}

const people: Person = {
  name: 'Sugar',
  age: 24,
};
2
3
4
5
6
7
8
9
属性必须和类型定义的时候完全一致。
少写了属性,报错:

多写了属性,报错:
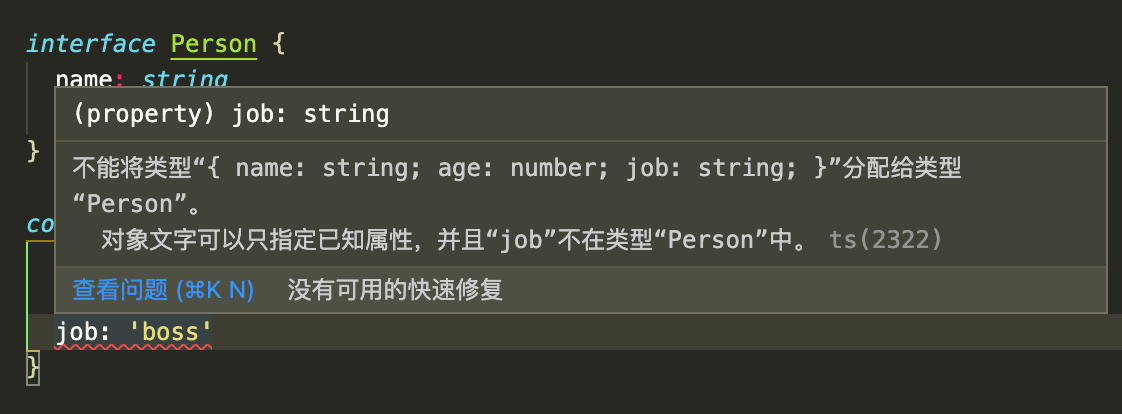
注意:interface 不是 JS 中的关键字,所以 TS 编译成 JS 之后,这些 interface 是不会被转换过去的,都会被删除掉,interface 只是在 TS 中用来做静态检查。
可选属性
跟函数的可选参数是类似的,在属性上加个 ?,这个属性就是可选的,比如下面的 age 属性
interface Person {
  name: string;
  age?: number;
}

const people: Person = {
  name: 'Sugar',
};
2
3
4
5
6
7
8
只读属性
如果希望某个属性不被改变,可以这么写:
interface Person {
  readonly id: number;
  name: string;
  age: number;
}
2
3
4
5
interface 描述函数类型
interface ISum {
  (x: number, y: number): number;
}

const add: ISum = (x, y) => {
  return x + y;
};
2
3
4
5
6
7
自定义属性(可索引的类型)
上文中,属性必须和类型定义的时候完全一致,如果一个对象上有多个不确定的属性,怎么办?
interface RandomKey {
  [x: string]: string;
}

const obj: RandomKey = {
  a: 'hello',
  b: 'Sugar',
  c: 'welcome',
};
2
3
4
5
6
7
8
9
如果把属性名定义为 number 类型,就是一个类数组了,看上去和数组一模一样。
interface LikeArray {
  [x: number]: string;
}

const arr: LikeArray = ['hello', 'Sugar'];

arr[0]; // 可以使用下标来访问值
2
3
4
5
6
7
当然,不是真的数组,数组上的方法它是没有的。

duck typing(鸭子类型)
看到这里,你会发现,interface 的写法非常灵活,它不是教条主义。
用 interface 可以创造一系列自定义的类型。
事实上, interface 还有一个响亮的名称:duck typing(鸭子类型)。
interface FunctionWithProps {
  (x: number): number;
  name: string;
}
2
3
4
FunctionWithProps 接口描述了一个函数类型,还向这个函数类型添加了 name 属性,这看上去完全是四不像,但是这个定义是完全可以工作的。
const fn: FunctionWithProps = (x) => {
  return x;
};

fn.name = 'hello world';
2
3
4
5
事实上, React 的 FunctionComponent(函数式组件) 就是这么写的,
interface FunctionComponent<P = {}> {
  (props: PropsWithChildren<P>, context?: any): ReactElement<any, any> | null;
  propTypes?: WeakValidationMap<P> | undefined;
  contextTypes?: ValidationMap<any> | undefined;
  defaultProps?: Partial<P> | undefined;
  displayName?: string | undefined;
}
2
3
4
5
6
7
现阶段我们只关心 FunctionComponent 是用 interface 描述的函数类型,且向这个函数类型添加了一大堆属性,完全四不像,但是却是完全正常的工作。
这就是 duck typing 和 interface,非常的灵活。
# 类
我们知道, JS 是靠原型和原型链来实现面向对象编程的,es6 新增了语法糖 class。
TS 通过 public、private、protected 三个修饰符来增强了 JS 中的类。
在 TS 中,写法和 JS 差不多,只是要定义一些类型而已,我们通过下面几个例子来复习一下类的封装、继承和多态。
基本写法
定义一个 Person 类,有属性 name 和 方法 speak
class Person {
  name: string;
  constructor(name: string) {
    this.name = name;
  }
  speak() {
    console.log(`${this.name} is speaking`);
  }
}

const p1 = new Person('Sugar'); // 新建实例

p1.name; // 访问属性和方法
p1.speak();
2
3
4
5
6
7
8
9
10
11
12
13
14
继承
使用 extends 关键字实现继承,定义一个 Student 类继承自 Person 类。
class Student extends Person {
  study() {
    console.log(`${this.name} needs study`);
  }
}

const s1 = new Student('Sugar');

s1.study();
2
3
4
5
6
7
8
9
继承之后,Student 类上的实例可以访问 Person 类上的属性和方法。

# super 关键字
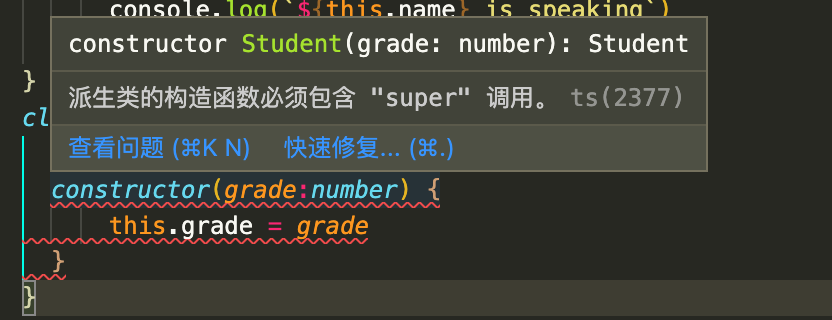
注意,上例中 Student 类没有定义自己的属性,可以不写 super ,但是如果 Student 类有自己的属性,就要用到 super 关键字来把父类的属性继承过来。
比如,Student 类新增一个 grade(成绩) 属性,就要这么写:
class Student extends Person {
  grade: number;
  constructor(name: string, grade: number) {
    super(name);
    this.grade = grade;
  }
}

const s1 = new Student('Sugar', 100);
2
3
4
5
6
7
8
9
不写 super 会报错:
多态
子类对父类的方法进行了重写,子类和父类调同一个方法时会不一样。
class Student extends Person {
  speak() {
    return `Student ${super.speak()}`;
  }
}
2
3
4
5
TS 中一般对抽象方法实现多态,详细见后文抽象类。
public
public,公有的,一个类里默认所有的方法和属性都是 public。
比如上文中定义的 Person 类,其实是这样的:
class Person {
  public name: string;
  public constructor(name: string) {
    this.name = name;
  }
  public speak() {
    console.log(`${this.name} is speaking`);
  }
}
2
3
4
5
6
7
8
9
private
private,私有的,只属于这个类自己,它的实例和继承它的子类都访问不到。
将 Person 类的 name 属性改为 private, 实例访问 name 属性,会报错:
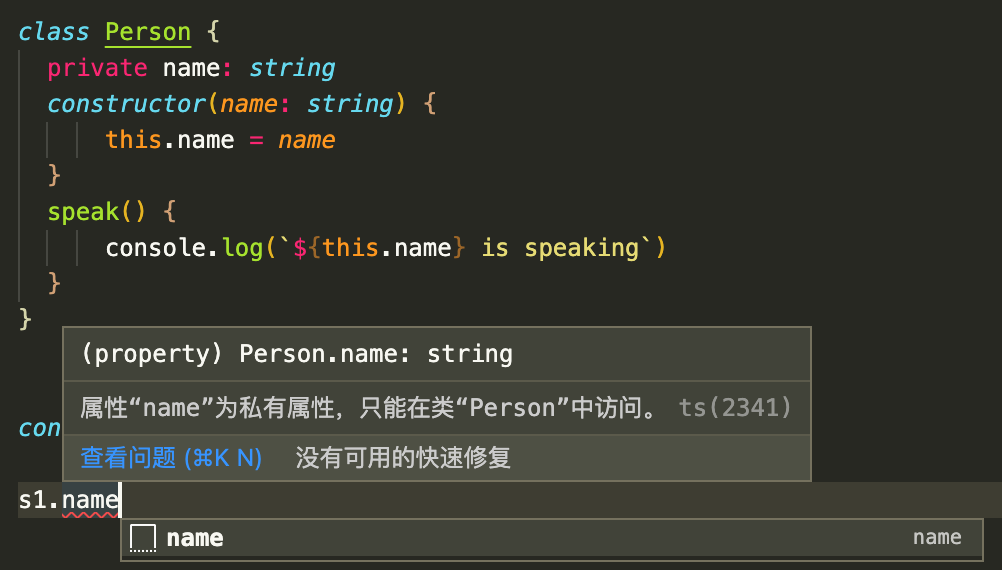
protected
protected 受保护的,继承它的子类可以访问,实例不能访问。
将 Person 类的 name 属性改为 protected。
class Person {
  protected name: string;
  public constructor(name: string) {
    this.name = name;
  }
  public speak() {
    console.log(`${this.name} is speaking`);
  }
}
2
3
4
5
6
7
8
9
实例访问 name 属性,会报错:
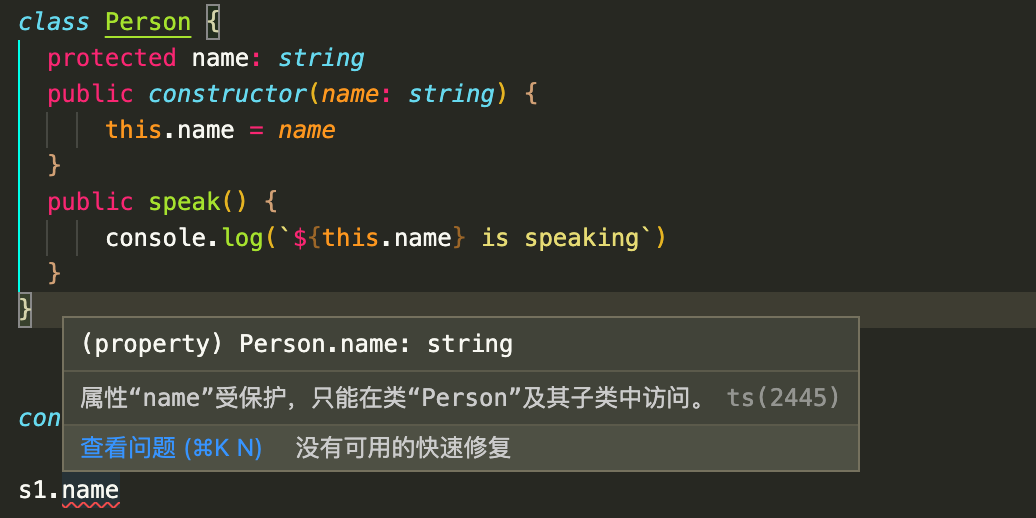
子类可以访问
class Student extends Person {
  study() {
    console.log(`${this.name} needs study`);
  }
}
2
3
4
5
static
static 是静态属性,可以理解为是类上的一些常量,实例和子类都不能访问。
比如一个 Circle 类,圆周率是 3.14,可以直接定义一个静态属性。
class Circle {
  static pi: 3.14;
  public radius: number;
  public constructor(radius: number) {
    this.radius = radius;
  }
  public calcLength() {
    return Circle.pi * this.radius * 2; // 计算周长,直接访问 Circle.pi
  }
}
2
3
4
5
6
7
8
9
10
抽象类
所谓抽象类,是指只能被继承,但不能被实例化的类,就这么简单。
抽象类有两个特点:
- 抽象类不允许被实例化
- 抽象类中的抽象方法必须被子类实现
抽象类用一个 abstract 关键字来定义,我们通过两个例子来感受一下抽象类的两个特点。
# 抽象类不允许被实例化
abstract class Animal {}

const a = new Animal();
2
3
定义一个抽象类 Animal,初始化一个 Animal 的实例,直接报错,

# 抽象类中的抽象方法必须被子类实现
abstract class Animal {
  public name: string;
  constructor(name: string) {
    this.name = name;
  }
  public abstract sayHi(): void;
}

class Dog extends Animal {
  constructor(name: string) {
    super(name);
  }
}
2
3
4
5
6
7
8
9
10
11
12
13
定义一个 Dog 类,继承自 Animal 类,但是却没有实现 Animal 类上的抽象方法 sayHi,报错,
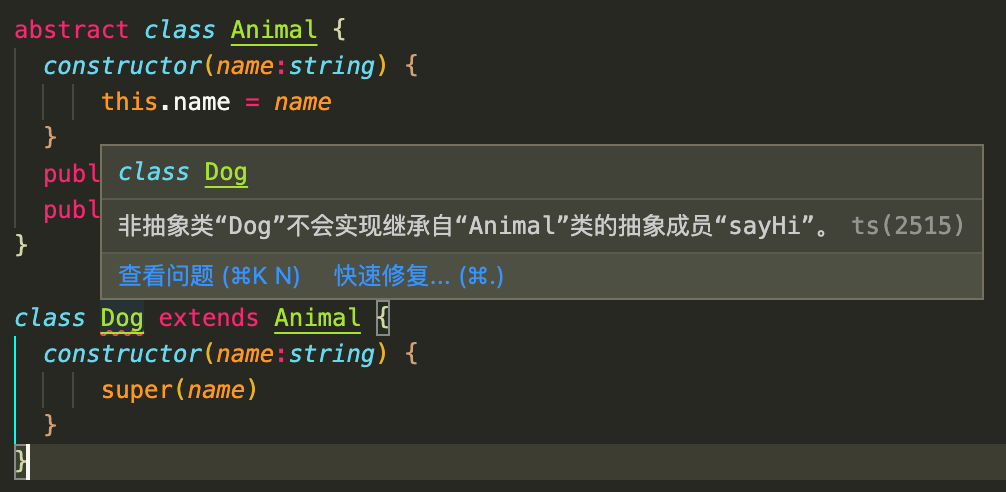
正确的用法如下:
abstract class Animal {
  public name: string;
  constructor(name: string) {
    this.name = name;
  }
  public abstract sayHi(): void;
}

class Dog extends Animal {
  constructor(name: string) {
    super(name);
  }
  public sayHi() {
    console.log('wang');
  }
}
2
3
4
5
6
7
8
9
10
11
12
13
14
15
16
# 为什么叫抽象类?
很显然,抽象类是一个广泛和抽象的概念,不是一个实体,就比如上文的例子,动物这个概念是很广泛的,猫、狗、狮子都是动物,但动物却不好是一个实例,实例只能是猫、狗或者狮子。
官方一点的说法是,在面向对象的概念中,所有的对象都是通过类来描绘的,但是反过来,并不是所有的类都是用来描绘对象的,如果一个类中没有包含足够的信息来描绘一个具体的对象,这样的类就是抽象类。
比如 Animal 类只是具有动物都有的一些属性和方法,但不会具体到包含猫或者狗的属性和方法。
所以抽象类的用法是用来定义一个基类,声明共有属性和方法,拿去被继承。
抽象类的好处是可以抽离出事物的共性,有利于代码的复用。
# 抽象方法和多态
多态是面向对象的三大基本特征之一。
多态指的是,父类定义一个抽象方法,在多个子类中有不同的实现,运行的时候不同的子类就对应不同的操作,比如:
abstract class Animal {
  public name: string;
  constructor(name: string) {
    this.name = name;
  }
  public abstract sayHi(): void;
}

class Dog extends Animal {
  constructor(name: string) {
    super(name);
  }
  public sayHi() {
    console.log('wang');
  }
}

class Cat extends Animal {
  constructor(name: string) {
    super(name);
  }
  public sayHi() {
    console.log('miao');
  }
}
2
3
4
5
6
7
8
9
10
11
12
13
14
15
16
17
18
19
20
21
22
23
24
25
Dog类和 Cat 类都继承自 Animal 类,Dog 类和 Cat 类都不同的实现了 sayHi 这个方法。
this 类型
接下来,我们介绍一种特殊的类型,this 类型。
类的成员方法可以直接返回一个 this,这样就可以很方便地实现链式调用。
# 链式调用
class StudyStep {
  step1() {
    console.log('listen');
    return this;
  }
  step2() {
    console.log('write');
    return this;
  }
}

const s = new StudyStep();

s.step1().step2(); // 链式调用
2
3
4
5
6
7
8
9
10
11
12
13
14
# 灵活调用子类父类方法
在继承的时候,this 可以表示父类型,也可以表示子类型
class StudyStep {
  step1() {
    console.log('listen');
    return this;
  }
  step2() {
    console.log('write');
    return this;
  }
}

class MyStudyStep extends StudyStep {
  next() {
    console.log('before done, study next!');
    return this;
  }
}

const m = new MyStudyStep();

m.step1()
  .next()
  .step2()
  .next(); // 父类型和子类型上的方法都可随意调用
2
3
4
5
6
7
8
9
10
11
12
13
14
15
16
17
18
19
20
21
22
23
24
这样就保持了父类和子类之间接口调用的连贯性
# interface 和 class 的关系
文中我们说过,interface 是 TS 设计出来用于定义对象类型的,可以对对象的形状进行描述。
interface 同样可以用来约束 class,要实现约束,需要用到 implements 关键字。
implements
implements 是实现的意思,class 实现 interface。
比如:
interface MusicInterface {
  playMusic(): void;
}

class Cellphone implements MusicInterface {
  playMusic() {}
}
2
3
4
5
6
7
定义了约束后,class 必须要满足接口上的所有条件。
如果 Cellphone 类上不写 playMusic 方法,会报错。

处理公共的属性和方法
不同的类有一些共同的属性和方法,使用继承很难完成。
比如汽车(Car 类)也有播放音乐的功能,你可以这么做:
- 用 Car 类继承 Cellphone 类
- 找一个 Car 类和 Cellphone 类的父类,父类有播放音乐的方法,他们俩继承这个父类
很显然这两种方法都不合常理。
实际上,使用 implements,问题就会迎刃而解。
interface MusicInterface {
  playMusic(): void;
}

class Car implements MusicInterface {
  playMusic() {}
}

class Cellphone implements MusicInterface {
  playMusic() {}
}
2
3
4
5
6
7
8
9
10
11
这样 Car 类和 Cellphone 类都约束了播放音乐的功能。
再比如,手机还有打电话的功能,就可以这么做,Cellphone 类 implements 两个 interface。
interface MusicInterface {
  playMusic(): void;
}

interface CallInterface {
  makePhoneCall(): void;
}

class Cellphone implements MusicInterface, CallInterface {
  playMusic() {}
  makePhoneCall() {}
}
2
3
4
5
6
7
8
9
10
11
12
interface 来约束 class,只要 class 实现了 interface 规定的属性或方法,就行了,没有继承那么多条条框框,非常灵活。
约束构造函数和静态属性
使用 implements 只能约束类实例上的属性和方法,要约束构造函数和静态属性,需要这么写。
interface CircleStatic {
  pi: number;
  new (radius: number): void;
}

const Circle: CircleStatic = class Circle {
  static pi: 3.14;
  public radius: number;
  public constructor(radius: number) {
    this.radius = radius;
  }
};
2
3
4
5
6
7
8
9
10
11
12
未定义静态属性 pi,会报错:
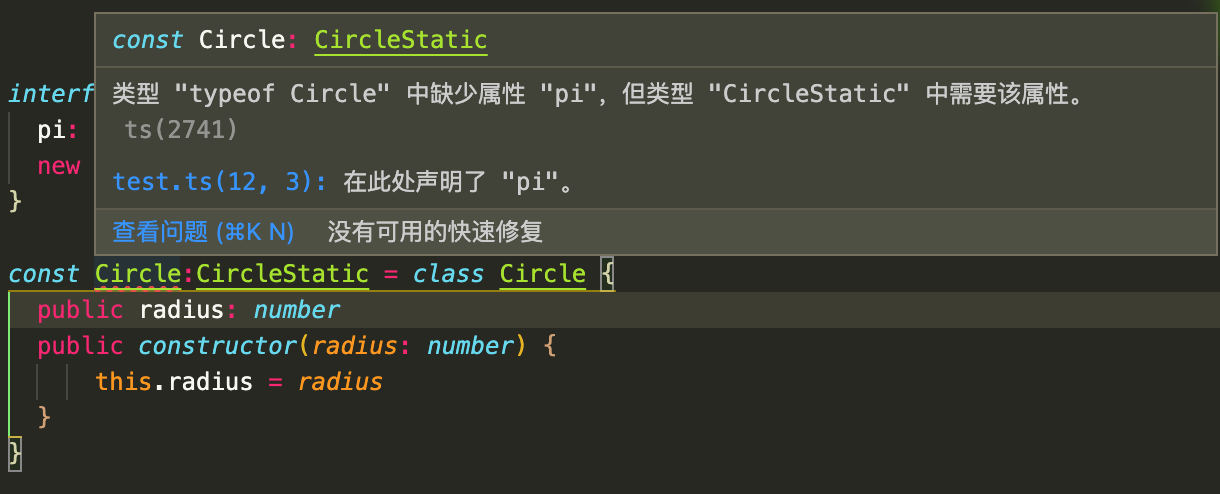
constructor 入参类型不对,会报错:
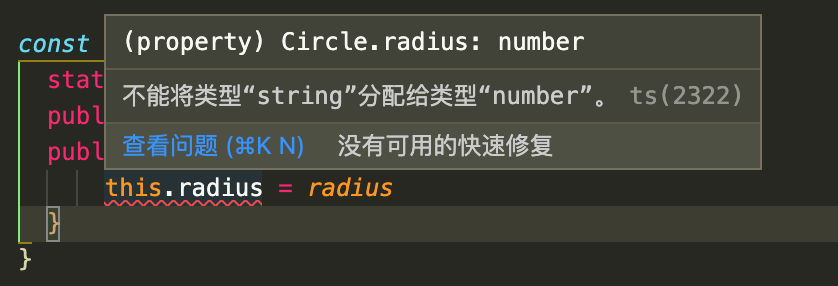
# 枚举
在任何项目开发中,我们都会遇到定义常量的情况,常量就是指不会被改变的值。
TS 中我们使用 const 来声明常量,但是有些取值是在一定范围内的一系列常量,比如一周有七天,比如方向分为上下左右四个方向。
这时就可以使用枚举(Enum)来定义。
基本使用
enum Direction {
  Up,
  Down,
  Left,
  Right,
}
2
3
4
5
6
这样就定义了一个数字枚举,他有两个特点:
- 数字递增
- 反向映射
枚举成员会被赋值为从 0 开始递增的数字,
console.log(Direction.Up); // 0
console.log(Direction.Down); // 1
console.log(Direction.Left); // 2
console.log(Direction.Right); // 3
2
3
4
枚举会对枚举值到枚举名进行反向映射,
console.log(Direction[0]); // Up
console.log(Direction[1]); // Down
console.log(Direction[2]); // Left
console.log(Direction[3]); // Right
2
3
4
如果枚举第一个元素赋有初始值,就会从初始值开始递增,
enum Direction {
  Up = 6,
  Down,
  Left,
  Right,
}

console.log(Direction.Up); // 6
console.log(Direction.Down); // 7
console.log(Direction.Left); // 8
console.log(Direction.Right); // 9
2
3
4
5
6
7
8
9
10
11
反向映射的原理
枚举是如何做到反向映射的呢,我们不妨来看一下被编译后的代码
var Direction;
(function(Direction) {
  Direction[(Direction['Up'] = 6)] = 'Up';
  Direction[(Direction['Down'] = 7)] = 'Down';
  Direction[(Direction['Left'] = 8)] = 'Left';
  Direction[(Direction['Right'] = 9)] = 'Right';
})(Direction || (Direction = {}));
2
3
4
5
6
7
主体代码是被包裹在一个自执行函数里,封装了自己独特的作用域。
执行 Direction[Direction["Up"] = 6] = "Up";
相当于执行
Direction['Up'] = 6;
Direction[6] = 'Up';
2
这样就实现了枚举的反向映射。
手动赋值
定义一个枚举来管理外卖状态,分别有已下单,配送中,已接收三个状态。
enum ItemStatus {
  Buy = 1,
  Send,
  Receive,
}
console.log(ItemStatus['Buy']); // 1
console.log(ItemStatus['Send']); // 2
console.log(ItemStatus['Receive']); // 3
2
3
4
5
6
7
8
但有时候后端给你返回的数据状态是乱的,就需要我们手动赋值。
比如后端说 Buy 是 100,Send 是 20,Receive 是 1,就可以这么写,
enum ItemStatus {
  Buy = 100,
  Send = 20,
  Receive = 1,
}

console.log(ItemStatus['Buy']); // 100
console.log(ItemStatus['Send']); // 20
console.log(ItemStatus['Receive']); // 1
2
3
4
5
6
7
8
9
计算成员
枚举中的成员可以被计算,比如经典的使用位运算合并权限,可以这么写,
enum FileAccess {
  Read = 1 << 1,
  Write = 1 << 2,
  ReadWrite = Read | Write,
}

console.log(FileAccess.Read); // 2   -> 010
console.log(FileAccess.Write); // 4   -> 100
console.log(FileAccess.ReadWrite); // 6   -> 110
2
3
4
5
6
7
8
9
看个实例吧,Vue3 源码中的 patchFlags,用于标识节点更新的属性。
// packages/shared/src/patchFlags.ts
export const enum PatchFlags {
  TEXT = 1, // 动态文本节点
  CLASS = 1 << 1, // 动态 class
  STYLE = 1 << 2, // 动态 style
  PROPS = 1 << 3, // 动态属性
  FULL_PROPS = 1 << 4, // 具有动态 key 属性,当 key 改变时,需要进行完整的 diff 比较
  HYDRATE_EVENTS = 1 << 5, // 具有监听事件的节点
  STABLE_FRAGMENT = 1 << 6, // 子节点顺序不会被改变的 fragment
  KEYED_FRAGMENT = 1 << 7, // 带有 key 属或部分子节点有 key 的 fragment
  UNKEYED_FRAGMENT = 1 << 8, // 子节点没有 key 的 fragment
  NEED_PATCH = 1 << 9, // 非 props 的比较,比如 ref 或指令
  DYNAMIC_SLOTS = 1 << 10, // 动态插槽
  DEV_ROOT_FRAGMENT = 1 << 11, // 仅供开发时使用,表示将注释放在模板根级别的片段
  HOISTED = -1, // 静态节点
  BAIL = -2, // diff 算法要退出优化模式
}
2
3
4
5
6
7
8
9
10
11
12
13
14
15
16
17
字符串枚举
字符串枚举的意义在于,提供有具体语义的字符串,可以更容易地理解代码和调试。
enum Direction {
  Up = 'UP',
  Down = 'DOWN',
  Left = 'LEFT',
  Right = 'RIGHT',
}

const value = 'UP';
if (value === Direction.Up) {
  // do something
}
2
3
4
5
6
7
8
9
10
11
常量枚举
上文的例子,使用 const 来定义一个常量枚举
const enum Direction {
  Up = 'UP',
  Down = 'DOWN',
  Left = 'LEFT',
  Right = 'RIGHT',
}

const value = 'UP';
if (value === Direction.Up) {
  // do something
}
2
3
4
5
6
7
8
9
10
11
编译出来的 JS 代码会简洁很多,提高了性能。
const value = 'UP';
if (value === 'UP' /* Up */) {
  // do something
}
2
3
4
不写 const 编译出来是这样的,
var Direction;
(function(Direction) {
  Direction['Up'] = 'UP';
  Direction['Down'] = 'DOWN';
  Direction['Left'] = 'LEFT';
  Direction['Right'] = 'RIGHT';
})(Direction || (Direction = {}));
const value = 'UP';
if (value === Direction.Up) {
  // do something
}
2
3
4
5
6
7
8
9
10
11
这一堆定义枚举的逻辑会在编译阶段会被删除,常量枚举成员在使用的地方被内联进去。
很显然,常量枚举不允许包含计算成员,不然怎么叫常量呢?
const enum Test {
  A = 'Sugar'.length,
}
2
3

总结一下,常量枚举可以避免在额外生成的代码上的开销和额外的非直接的对枚举成员的访问。
小结
枚举的意义在于,可以定义一些带名字的常量集合,清晰地表达意图和语义,更容易地理解代码和调试。
常用于和后端联调时,区分后端返回的一些代表状态语义的数字或字符串,降低阅读代码时的心智负担。
# 类型推论
TypeScript 里,在有些没有明确指出类型的地方,类型推论会帮助提供类型。
这种推断发生在初始化变量和成员,设置默认参数值和决定函数返回值时。
定义时不赋值
let a;

初始化变量
let userName = 'Sugar';

因为赋值的时候赋的是一个字符串类型,所以 TS 自动推导出 userName 是 string 类型。
这个时候,再更改 userName 时,就必须是 string 类型,是其他类型就报错,比如:

设置默认参数值
函数设置默认参数时,也会有自动推导
比如,定义一个打印年龄的函数,默认值是 24
function printAge(num = 24) {
  console.log(num);
  return num;
}
2
3
4
那么 TS 会自动推导出 printAge 的入参类型,传错了类型会报错。

决定函数返回值
决定函数返回值时, TS 也会自动推导出返回值类型。
比如一个 Promise 函数
async function welcome() {
  return 'hello';
}
2
3

定义的类型和 TS 自动推导出的类型冲突,报错:

最佳通用类型
当需要从几个表达式中推断类型时候,会使用这些表达式的类型来推断出一个最合适的通用类型。比如,

虽然 TS 可以推导出最合适的类型,但最好还是在写的时候就定义好类型
小结
类型推论虽然能为我们提供帮助,但既然写了 TS,除非是函数默认返回类型为 void 这种大家都知道的,其他的最好每个地方都定义好类型。
# 内置类型
JavaScript 中有很多内置对象,它们可以直接在 TypeScript 中当做定义好了的类型。
内置对象是指根据标准在全局作用域 global 上存在的对象,这里的标准指的是 ECMAcript 和 其他环境(比如DOM) 的标准。
JS 八种内置类型
let name: string = 'Sugar';
let age: number = 24;
let isHandsome: boolean = true;
let u: undefined = undefined;
let n: null = null;
let obj: object = { name: 'Sugar', age: 24 };
let big: bigint = 100n;
let sym: symbol = Symbol('Sugar');
2
3
4
5
6
7
8
ECMAScript 的内置对象
比如,Array、Date、Error、RegExp 等,
const nums: Array<number> = [1, 2, 3];

const date: Date = new Date();

const err: Error = new Error('Error!');

const reg: RegExp = /abc/;

Math.pow(2, 9);
2
3
4
5
6
7
8
9
以 Array 为例,Vscode 中按住 comand/ctrl,再鼠标左键点击一下,就能跳转到类型声明的地方。
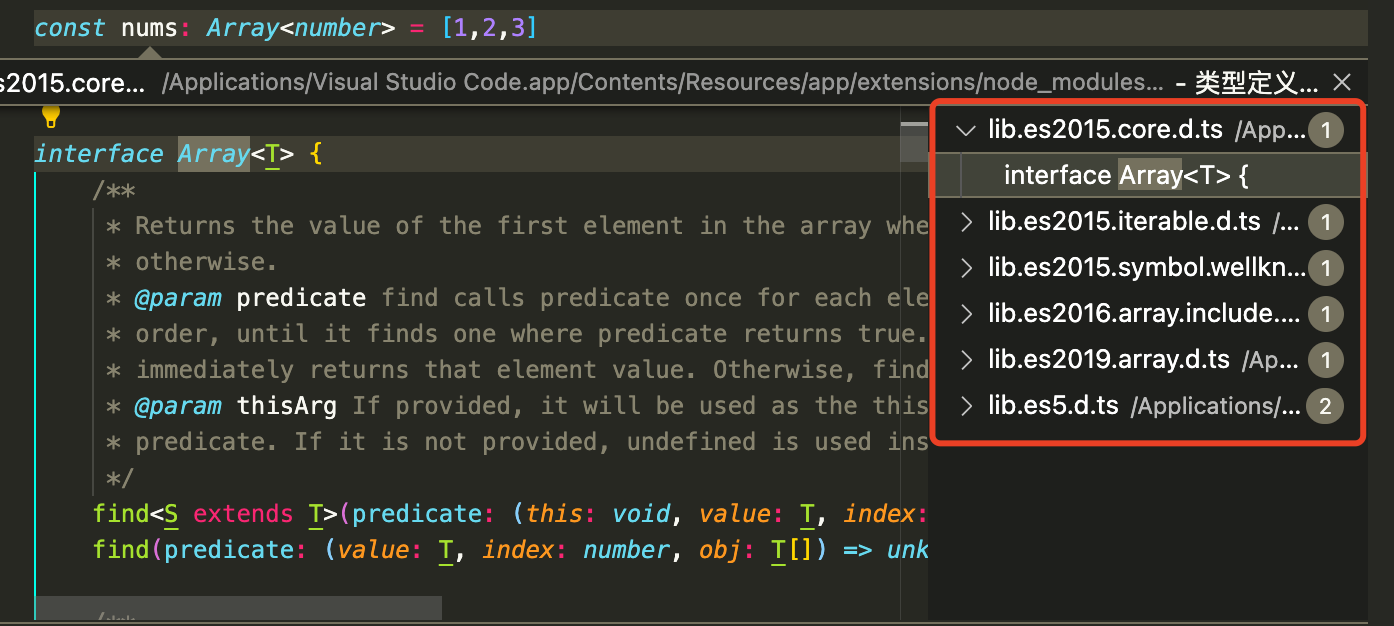
可以看到,Array 这个类型是用 interface 定义的,有多个不同版本的 .d.ts 文件声明了这个类型。
在 TS 中,重复声明一个 interface,会把所有的声明全部合并,这里所有的 .d.ts 文件合并出来的 Array 接口,就组合成了 Array 内置类型的全部属性和功能。
DOM 和 BOM
比如 HTMLElement、NodeList、MouseEvent 等
let body: HTMLElement = document.body;

let allDiv: NodeList = document.querySelectorAll('div');

document.addEventListener('click', (e: MouseEvent) => {
  e.preventDefault();
  // Do something
});
2
3
4
5
6
7
8
TS 核心库的定义文件
TypeScript 核心库的定义文件 中定义了所有浏览器环境需要用到的类型,并且是预置在 TypeScript 中的。
比如 Math.pow 的类型定义如下,
interface Math {
  /**
   * Returns the value of a base expression taken to a specified power.
   * @param x The base value of the expression.
   * @param y The exponent value of the expression.
   */
  pow(x: number, y: number): number;
}
2
3
4
5
6
7
8
又比如,addEventListener 的类型定义如下,
interface Document
  extends Node,
    GlobalEventHandlers,
    NodeSelector,
    DocumentEvent {
  addEventListener(
    type: string,
    listener: (ev: MouseEvent) => any,
    useCapture?: boolean
  ): void;
}
2
3
4
5
6
7
8
9
10
11
